Recall, Precision, F1, ROC, AUC, and everything

Your boss asked you to build a fraud detection classifier, so you’ve created one.

The output of your fraud detection model is the probability [0.0-1.0] that a transaction is fraudulent. If this probability is below 0.5, you classify the transaction as non-fraudulent; otherwise, you classify the transaction as fraudulent.

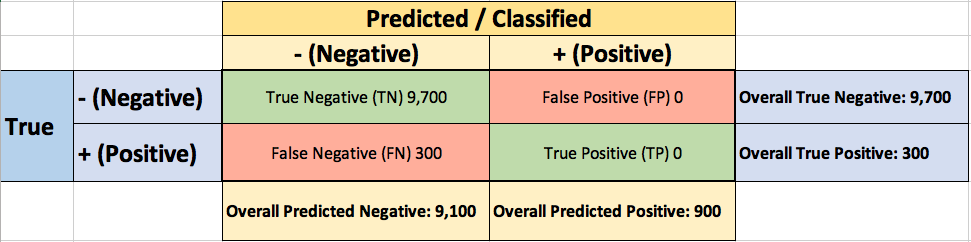
To evaluate the performance of your model, you collect 10,000 manually classified transactions, with 300 fraudulent transaction and 9,700 non-fraudulent transactions. You run your classifier on every transaction, predict the class label (fraudulent or non-fraudulent) and summarise the results in the following confusion matrix:

A True Positive (TP=100) is an outcome where the model correctly predicts the positive (fraudulent) class. Similarly, a True Negative (TN=9,000) is an outcome where the model correctly predicts the negative (non-fraudulent) class.

False Positive (FP=700) is an outcome where the model incorrectly predicts the positive  (fraudulent) class. And a False Negative (FN=200) is an outcome where the model incorrectly predicts the negative (non-fraudulent) class.

Asking yourself what percent of your predictions were correct, you calculate the accuracy:

Accuracy = \frac{True}{True+False} = \frac{TP+TN}{TP+TN+FP+FN} = \frac{100+9,000}{100+9,000+700+200} = \frac{9,100}{10,000} = 0.91

Wow, 91% accuracy! Just before sharing the great news with your boss, you notice that out of the 300 fraudulent transactions, only 100 fraudulent transactions are classified correctly. Your classifier missed 200 out of the 300 fraudulent transactions!

Your colleague, hardly hiding her simile, suggests a “better” classifier. Her classifier predicts every transaction as non-fraudulent (negative), with a staggering 97% accuracy!

Accuracy =   \frac{True}{True+False} = \frac{TP+TN}{TP+TN+FP+FN} = \frac{0+9,700}{100+9,000+700+200} = \frac{9,700}{10,000} = 0.97

While 97% accuracy may seem excellent at first glance, you’ve soon realized the catch: your boss asked you to build a fraud detection classifier, and with the always-return-non-fraudulent classifier you will miss all the fraudulent transactions.

“Nothing travels faster than the speed of light, with the possible exception of bad news, which obeys its own special laws.” 

Douglas Adams

You learned the hard-way that accuracy can be misleading and that for problems like this, additional measures are required to evaluate your classifier.

You start by asking yourself what percent of the positive (fraudulent) cases did you catch? You go back to the confusion matrix and divide the True Positive (TP – blue oval) by the overall number of true fraudulent transactions (red rectangle)

Recall ( True Positive Rate ) = \frac{TP}{TP+FN} = \frac{100}{100+200} \approx 0.333

So the classier caught 33.3% of the fraudulent transactions.

Next, you ask yourself what percent of positive (fraudulent) predictions were correct? You go back to the confusion matrix and divide the True Positive (TP – blue oval) by the overall number of predicted fraudulent transactions (red rectangle)

Precision =   \frac{TP}{TP+FP} = \frac{100}{100+700} = 0.125

So now you know that when your classifier predicts that a transaction is fraudulent, only 12.5% of the time your classifier is correct.

F1 Score combines Recall and Precision to one performance metric. F1 Score is the weighted average of Precision and Recall. Therefore, this score takes both false positives and false negatives into account. F1 is usually more useful than Accuracy, especially if you have an uneven class distribution.

F1 = 2*\frac{Recall * Precision}{ Recall + Precision}=2*\frac{0.333 * 0.125}{ 0.333 + 0.125}\approx 0.182

Finally, you ask yourself what percent of negative (non-fraudulent) predictions were incorrect? You go back to the confusion matrix and divide the False Positive (FP – blue oval) by the overall number of true non-fraudulent transactions (red rectangle)

False Positive Rate = \frac{FP}{FP+TN} = \frac{700}{700+9,000} \approx 0.072

7.2% of the non-fraudulent transactions were classified incorrectly as fraudulent transactions.

ROC (Receiver Operating Characteristics)

You soon learn that you must examine both Precision and Recall. Unfortunately, Precision and Recall are often in tension. That is, improving Precision typically reduces Recall and vice versa.

The overall performance of a classifier, summarized over all possible thresholds, is given by the Receiver Operating Characteristics (ROC) curve. The name “ROC” is historical and comes from communications theory. ROC Curves are used to see how well your classifier can separate positive and negative examples and to identify the best threshold for separating them.

To be able to use the ROC curve, your classifier should be able to rank examples such that the ones with higher rank are more likely to be positive (fraudulent). As an example, Logistic Regression outputs probabilities, which is a score that you can use for ranking.

You train a new model and you use it to predict the outcome of 10 new test transactions, summarizing the result in the following table: the values of the middle column (True Label) are either zero (0) for non-fraudulent transactions or one (1) for fraudulent transactions, and the last column (Fraudulent Prob) is the probability that the transaction is fraudulent:

Remember the 0.5 threshold? If you are concerned about missing the two fraudulent transactions (red circles), then you may consider lowering this threshold.

For instance, you might lower the threshold and label any transaction with a probability below 0.1 to the non-fraudulent class, catching the two fraudulent transactions that you previously missed.

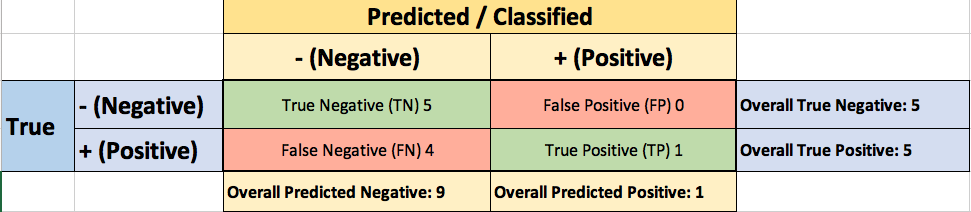
To derive the ROC curve, you calculate the True Positive Rate (TPR) and the False Positive Rate (FPR), starting by setting the threshold to 1.0, where every transaction with a Fraudulent Prob of less than 1.0 is classified as non-fraudulent (0). The column “T=1.0” shows the predicted class labels when the threshold is 1.0:

The confusion matrix for the Threshold=1.0 case:

The ROC curve is created by plotting the True Positive Pate (TPR) against the False Positive Rate (FPR) at various threshold settings, so you calculate both:

True Positive Rate (Recall) = \frac{TP}{TP+FN} = \frac{0}{0+5} =0

False Positive Rate = \frac{FP}{FP+TN} = \frac{0}{0+5} =0

You summarize it in the following table:

Now you can finally plot the first point on your ROC graph! A random guess would give a point along the dotted diagonal line (the so-called line of no-discrimination) from the left bottom to the top right corners

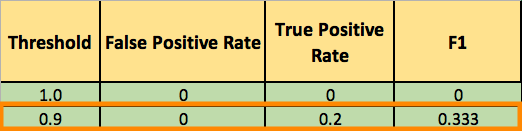
You now lower the threshold to 0.9, and recalculate the FPR and the TPR:

The confusion matrix for Threshold=0.9:

True Positive Rate (Recall) = \frac{TP}{TP+FN} = \frac{1}{1+4} =0.2

False Positive Rate = \frac{FP}{FP+TN} = \frac{0}{0+5} =0

Adding a new row to your summary table:

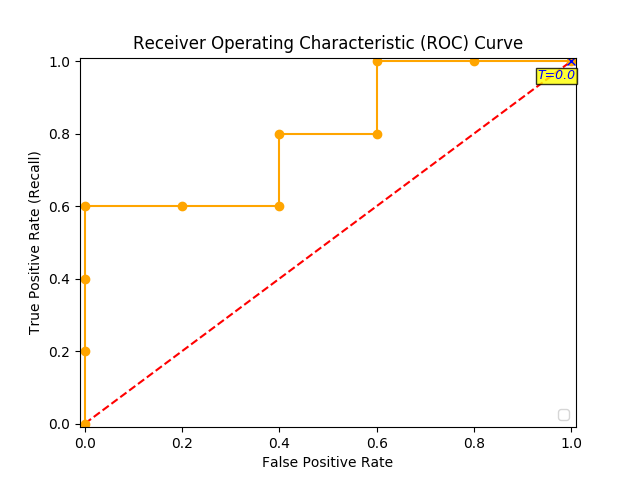
You continue and plot the True Positive Pate (TPR) against the False Positive Rate (FPR) at various threshold settings:

Receiver Operating Characteristics (ROC) curve

And voila, here is your ROC curve!

AUC (Area Under the Curve)

The model performance is determined by looking at the area under the ROC curve (or AUC). An excellent model has AUC near to the 1.0, which means it has a good measure of separability. For your model, the AUC is the combined are of the blue, green and purple rectangles, so the AUC = 0.4 x 0.6 + 0.2 x 0.8 + 0.4 x 1.0 = 0.80.

You can validate this result by calling roc_auc_score, and the result is indeed 0.80.

Conclusion

  • Accuracy will not always be the metric.
  • Precision and recall are often in tension. That is, improving precision typically reduces recall and vice versa.
  • AUC-ROC curve is one of the most commonly used metrics to evaluate the performance of machine learning algorithms.
  • ROC Curves summarize the trade-off between the true positive rate and false positive rate for a predictive model using different probability thresholds.
  • The ROC curve can be used to choose the best operating point.

Thanks for Reading! You can reach me at LinkedIn and Twitter.

References:

[1] An Introduction to Statistical Learning [James, Witten, Hastie, and Tibshirani]

How to debug and test your regular expression (regex)

Regular expressions are such an incredibly convenient tool, available across so many languages that most developers will learn them sooner or later.

But regular expressions can become quite complex. The syntax is terse, subtle, and subject to combinatorial explosion.

The best way to improve your skills is to write a regular expression, test it on some real data, debug the expression, improve it and repeat this process again and again.

This is why regex101 (https://regex101.com/) is such a great tool.

Not only does it let you test out your regexes on a sample set, color coding your match groups:

But it also gives you a full explanation of what’s going on under the hood.

You can review the match information:

And even choose your favorite flavor (PHP, JavaScript, Python or Golan)

How can I create email notifications for when an Amazon EMR cluster or step changes state?

Create an SNS topic. This topic is the target for the CloudWatch Events rule.

Open the AWS Identity and Access Management (IAM) console, and then choose Roles in the navigation pane.

Click on the name of the role that is attached to your cluster’s Amazon Elastic Compute Cloud (Amazon EC2) instances (for example, EMR_EC2_DefaultRole) and click Attach policies

Attach the AmazonSNSFullAccess policy to the role. This policy allows SNS to send notifications based on state changes in your Amazon EMR cluster.

A summary page is presented with the message “Policy AmazonSNSFullAccess has been attached for the EMR_EC2_DefaultRole.”

Open the CloudWatch console at https://console.aws.amazon.com/cloudwatch/ and create a CloudWatch Events Rule That Triggers on an Event


Choose Event PatternBuild event pattern to match events by service. For Service Name, choose the service that emits the event to trigger the rule. For Event Type, choose the specific event that is to trigger the rule.

For Targets, choose Add Target and choose the AWS service that is to act when an event of the selected type is detected

Choose Configure details. For Rule definition, type a name and description for the rule.

Once created, the message “Rule emr_state_change_SNS was created.” will be presented

based on https://aws.amazon.com/premiumsupport/knowledge-center/alarm-emr-cluster-change/

How to run PySpark 2.4.0 in Jupyter Notebook on Mac

Install Jupyter notebook

$ pip3 install jupyter

Install PySpark

Make sure you have Java 8 or higher installed on your computer and visit the Spark download page

Select the latest Spark release, a prebuilt package for Hadoop, and download it directly.

Unzip it and move it to your /opt folder:

$ tar -xzf spark-2.4.0-bin-hadoop2.7.tgz
$ sudo mv spark-2.4.0-bin-hadoop2.7 /opt/spark-2.4.0

A symbolic link is like a shortcut from one file to another. The contents of a symbolic link are the address of the actual file or folder that is being linked to.

Create a symbolic link (this will let you have multiple spark versions):

$ sudo ln -s /opt/spark-2.4.0 /opt/spark̀

Check that the link was indeed created

$ ls -l /opt/spark̀

lrwxr-xr-x 1 root wheel 16 Dec 26 15:08 /opt/spark̀ -> /opt/spark-2.4.0

Finally, tell your bash where to find Spark. To find what shell you are using, type:

$ echo $SHELL
/bin/bash

To do so, edit your bash file:

$ nano ~/.bash_profile

configure your $PATH variables by adding the following lines to your ~/.bash_profile file:

export SPARK_HOME=/opt/spark
export PATH=$SPARK_HOME/bin:$PATH
# For python 3, You have to add the line below or you will get an error
export PYSPARK_PYTHON=python3

Now to run PySpark in Jupyter you’ll need to update the PySpark driver environment variables. Just add these lines to your ~/.bash_profile file:

export PYSPARK_DRIVER_PYTHON=jupyter
export PYSPARK_DRIVER_PYTHON_OPTS='notebook'

Your ~/.bash_profile file may look like this:

Restart (our just source) your terminal and launch PySpark:

$ pyspark

This command should start a Jupyter Notebook in your web browser. Create a new notebook by clicking on ‘New’ > ‘Notebooks Python [default]’.

Running PySpark in Jupyter Notebook

The PySpark context can be

sc = SparkContext.getOrCreate()

To check if your notebook is initialized with SparkContext, you could try the following codes in your notebook:

sc = SparkContext.getOrCreate()
import numpy as np
TOTAL = 10000
dots = sc.parallelize([2.0 * np.random.random(2) - 1.0 for i in range(TOTAL)]).cache()
print("Number of random points:", dots.count())
stats = dots.stats()
print('Mean:', stats.mean())
print('stdev:', stats.stdev())

The result:

Running PySpark in your favorite IDE

Sometimes you need a full IDE to create more complex code, and PySpark isn’t on sys.path by default, but that doesn’t mean it can’t be used as a regular library. You can address this by adding PySpark to sys.path at runtime. The package findspark does that for you.

To install findspark just type:

$ pip3 install findspark

And then on your IDE (I use Eclipse and Pydev) to initialize PySpark, just call:

import findspark
findspark.init()
import pyspark
sc = pyspark.SparkContext(appName="myAppName")

Here is a full example of a standalone application to test PySpark locally 

import findspark
findspark.init()
import random
from pyspark import SparkContext
sc = SparkContext(appName="EstimatePi")
def inside(p):
x, y = random.random(), random.random()
return x<em>x + y</em>y &lt; 1
NUM_SAMPLES = 1000000
count = sc.parallelize(range(0, NUM_SAMPLES)) \
.filter(inside).count()
print("Pi is roughly %f" % (4.0 * count / NUM_SAMPLES))
sc.stop()

The result:

Enjoy!

Based on this article and on this article

Error when executing `jupyter notebook` (-bash: jupiter: command not found) [Mac]

After installing jupyter

pip3 install --upgrade pip
pip3 install jupyter

and trying to launch 

jupyter notebook

the following error message appeared

-bash: jupyter: command not found

The solution:  

pip3 install --upgrade --force-reinstall --no-cache-dir jupyter 

Fighting Digital Payments Fraud with Deep Learning

Interesting presentation today at the DataScience SG meet-up

Conventional fraud prevention methods are rule based, expansive and slow to implement

Q1 2016: $5 of every $100 subject to fraud attack!

Key fraud types: account takeover, friendly fraud & fraud due to stolen card information

Consumers want: easy, instant, customized, mobile and dynamic options to suit their personal situation. Consumers do NOT want to be part of the fraud detection process.

Key technology enablers:

Historically fraud detection systems have relied on rues hand-curated by fraud experts to catch fraudulent activity.

An auto-encoder is a neural network trained to reconstruct its inputs, which forces a hidden layer to try and to learn good representations of the input

Kaggle dataset:

Train Autoencoder on normal transactions and using the Autoencoder transformation there is now a clear separation between the normal and the fraudulent transactions.

The Secret Recipe Behind GO-FOOD’s Recommendations (PyData Meetup)

The December PyData Meetup started with Luis Smith, Data Scientist at GO-JEK, sharing the Secret Recipe Behind GO-FOOD’s Recommendations:

“For GO-FOOD, we believe the key to unlocking good recommendations is to derive vector representations for our users, dishes, and merchants. This way we are able to capture our users’ food preferences and recommend them the most relevant merchants and dishes.”

How do people think about the food?

  • Flavor profile
  • Trendy
  • Value for money
  • Portion size
  • Ingredients

… and much more

The preferred approach is to let the transactional data discover the pattern.

A sample ETL workflow:

Using StarSpace to learn the vector representations:

Go-Jek formulation of the problem:

User-to-dish similarity is surfaced in the app via the “dishes you might like”. The average vector of customer’s purchases represents the recommended dish.

Due to data sparsity, item-based collaborative filtering is used for merchant recommendation.

The cold start problem is still an issue, for inactive users or users that purchase infrequently.

(published here)

Understanding the Unpacking Operators (* and **) in Python 3.x

The * operator unpack the arguments out of a list or tuple.
> args = [3, 6]
> list(range(*args))
[3, 4, 5]

As an example, when we have a list of three arguments, we can use the * operator inside a function call to unpack it into the three arguments:

def f(a,b,c):
    print('a={},b={},c={}'.format(a,b,c))

> z = ['I','like','Python']
> f(*z)
a=I,b=like,c=Python

> z = [['I','really'],'like','Python']
> f(*z)
a=['I', 'really'],b=like,c=Python

In Python 3 it is possible to use the operator * on the left side of an assignment, allowing to specify a “catch-all” name which will be assigned a list of all items not assigned to a “regular” name:

> a, *b, c = range(5)
> a
0
> c
4
> b
[1, 2, 3]

The ** operator can be used to unpack a dictionary of arguments as a collection of keyword arguments. Calling the same function f that we defined above:


> d = {'c':'Python','b':'like', 'a':'I'}
> f(**d)
a=I,b=like,c=Python

and when there is a missing argument in the dictionary (‘a’ in this example),  the following error message will be printed:


> d2 = {'c':'Python','b':'like'}
> f(**d2)
Traceback (most recent call last):
  File "<stdin>", line 1, in <module>
TypeError: f() missing 1 required positional argument: 'a'

 
Tried with: Python 3.6.5

Highlights of the 2018 Singapore Symposium on Natural Language Processing (SSNLP)

What a great symposium! Thank you Dr. Linlin Li, Prof. Ido Dagan, Prof. Noah Smith and the rest of the speakers for the interesting talks and thank you Singapore University of Technology and Design (SUTD) for hosting this event. Here is a quick summary of the first half of the symposium, you can learn more by looking for the papers published by these research groups:

Linlin Li: The text processing engine that powers Alibaba’s business applications

Dr. Linlin Li from Alibaba presented the mission of Alibaba’s NLP group and spoke about AliNLP, a large scale NLP technology platform for the entire Alibaba Eco-system, dealing with data collection and multilingual algorithms for lexical, syntactic, semantic, discourse analysis and distributed representation of text.

Alibaba is also helping to improve the quality of the Electronic Medical Records (EMRs) in China, traditionally done by labour intensive methods.

Ido Dagan: Consolidating Textual Information

Prof. Ido Dagan gave an excellent presentation on Natural Knowledge Consolidating Textual Information. Texts come in large multitudes, such as news story, search results, and product reviews. Search interfaces hasn’t changed much in decades, which make them accessible, but hard to consume. For example, the news tweets illustration in the slide below shows that here is a lot of redundancy and complementary information, so there is a need to consolidate the knowledge within multiple texts.

Generic knowledge representation via structured knowledge graphs and semantic representation are often being used, where both approaches require an expert to annotate the dataset, which is expansive and hard to replicate.

The structure of a single sentence will look like this:

The information can be consolidated across the various data sources via Coreference

To conclude

Noah A. Smith: Syncretizing Structured and Learned Representation

Prof. Noah described new ways to use representation learning for NLP

Some promising results

Prof. Noah presented different approaches to solve backpropagation with structure in the middle, where the intermediate representation is non-differentiable.

See you all the the next conference!

Installing Wand (0.4) and ImageMagick v6 on Mac (macOS High Sierra v 10.13.5)

wizard

ImageMagick® is used to create, edit, compose, or convert bitmap images. It can read and write images in a variety of formats (over 200) including PNG, JPEG, GIF, HEIC, TIFF, DPX, EXR, WebP, Postscript, PDF, and SVG. Use ImageMagick to resize, flip, mirror, rotate, distort, shear and transform images, adjust image colors, apply various special effects, or draw text, lines, polygons, ellipses and Bézier curves.

Wand is a ctypes-based simple ImageMagick binding for Python, so go through the step-by-step guide on how to install it.

Let’s start by installing ImageMagic:

brew install imagemagick@6

Next, create a symbolic link, with the following command (replace <your specific 6 version> with your specific version):

ln -s /usr/local/Cellar/imagemagick@6/<your specific 6 version>/lib/libMagickWand-6.Q16.dylib /usr/local/lib/libMagickWand.dylib

In my case, it was:

ln -s /usr/local/Cellar/imagemagick@6/6.9.10-0/lib/libMagickWand-6.Q16.dylib /usr/local/lib/libMagickWand.dylib

Let’s install Wand

pip3 install Wand

Now, let’s try to run the code

from wand.image import Image

with Image(filename=sourceFullPathFilename) as img:
img.save(filename=targetFilenameFull)

Unfortunately, I got the following error message:

wand.exceptions.DelegateError: FailedToExecuteCommand `’gs’ -sstdout=%stderr -dQUIET -dSAFER -dBATCH -dNOPAUSE -dNOPROMPT -dMaxBitmap=500000000 -dAlignToPixels=0 -dGridFitTT=2 ‘-sDEVICE=pngalpha’ -dTextAlphaBits=4 -dGraphicsAlphaBits=4 ‘-r72x72’ ‘-sOutputFile=/var/folders/n7/9xyh2rj14qvf3hrmr7g9b4gm0000gp/T/magick-31607l23fY21KEi6b%d’ ‘-f/var/folders/n7/9xyh2rj14qvf3hrmr7g9b4gm0000gp/T/magick-31607_nNNZjiBBusp’ ‘-f/var/folders/n7/9xyh2rj14qvf3hrmr7g9b4gm0000gp/T/magick-31607Zfemn9tWrdiY” (1) @ error/pdf.c/InvokePDFDelegate/292
Exception ignored in: <bound method Resource.__del__ of <wand.image.Image: (empty)>>

It seems that ghostscript is not installed by default, so let’s install it:

brew install ghostscript

Now we will need to create a soft link to /usr/bin, but /usr/bin/ in OS X 10.11+ is protected.

Just follow these steps:

1. Reboot to Recovery Mode. Reboot and hold “Cmd + R” after start sound.
2. In Recovery Mode go to Utilities -> Terminal.
3. Run: csrutil disable
4. Reboot in Normal Mode.
5. Do the “sudo ln -s /usr/local/bin/gs /usr/bin/gs” in terminal.
6. Do the 1 and 2 step. In terminal enable back csrutil by run: csrutil enable

(based on this)

Now it works – Enjoy!