Click on the name of the role that is attached to your cluster’s Amazon Elastic Compute Cloud (Amazon EC2) instances (for example, EMR_EC2_DefaultRole) andclick Attach policies
Attach the AmazonSNSFullAccess policy to the role. This policy allows SNS to send notifications based on state changes in your Amazon EMR cluster.
A summary page is presented with the message “Policy AmazonSNSFullAccess has been attached for the EMR_EC2_DefaultRole.”
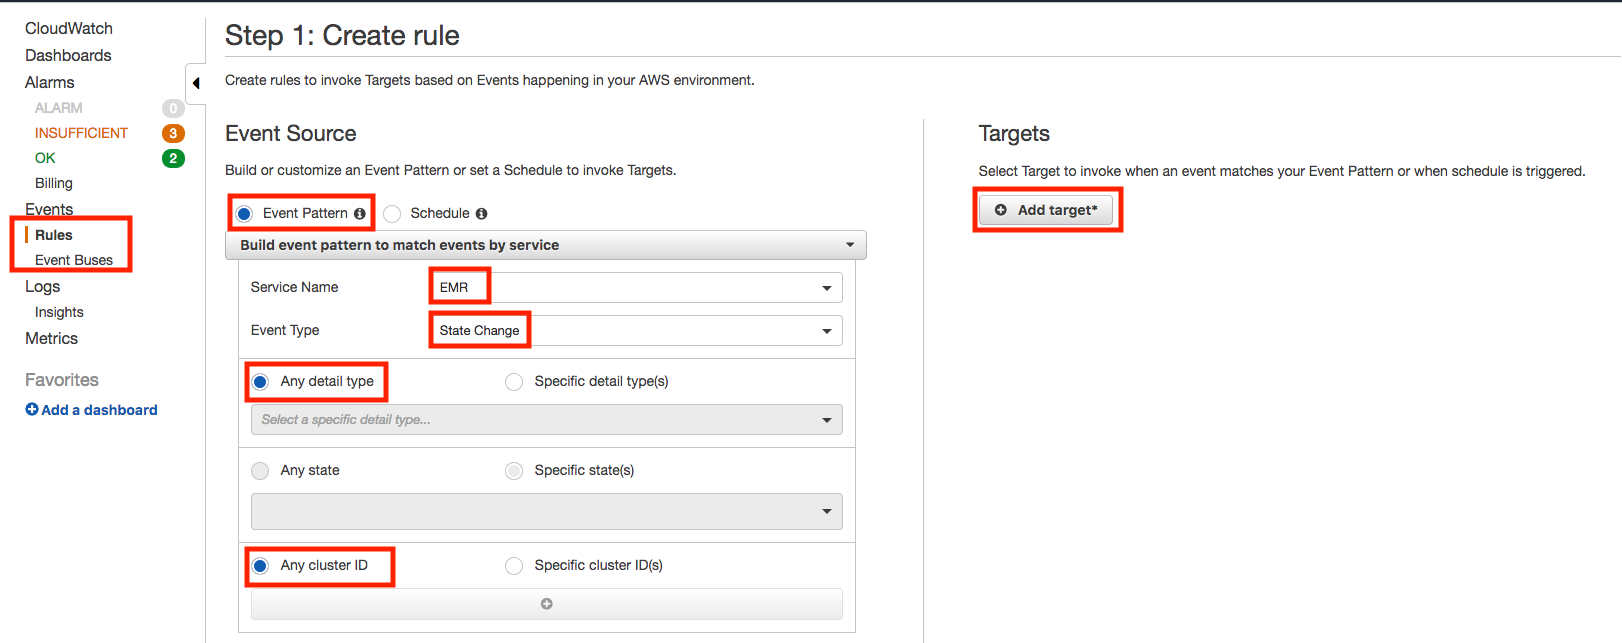
Choose Event Pattern, Build event pattern to match events by service. For Service Name, choose the service that emits the event to trigger the rule. For Event Type, choose the specific event that is to trigger the rule.
For Targets, choose Add Target and choose the AWS service that is to act when an event of the selected type is detected
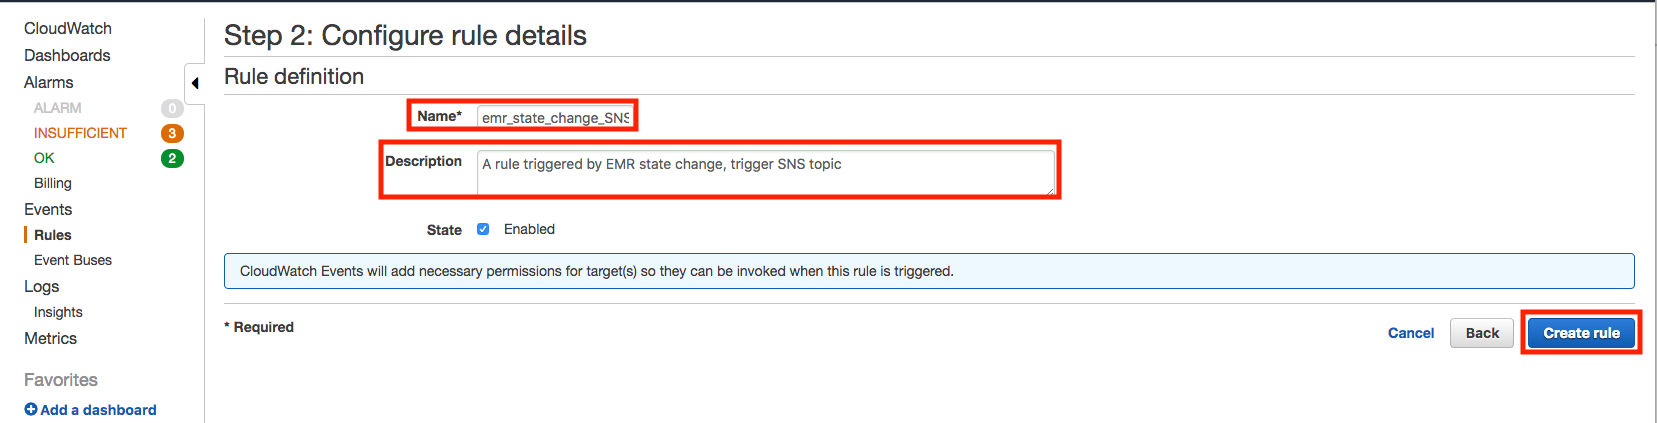
Choose Configure details. For Rule definition, type a name and description for the rule.
Once created, the message “Rule emr_state_change_SNS was created.” will be presented
Make sure you have Java 8 or higher installed on your computer and visit the Spark download page
Select the latest Spark release, a prebuilt package for Hadoop, and download it directly.
Unzip it and move it to your /opt folder:
$ tar -xzf spark-2.4.0-bin-hadoop2.7.tgz
$ sudo mv spark-2.4.0-bin-hadoop2.7 /opt/spark-2.4.0
A symbolic link is like a shortcut from one file to another. The contents of a symbolic link are the address of the actual file or folder that is being linked to.
Create a symbolic link (this will let you have multiple spark versions):
Finally, tell your bash where to find Spark. To find what shell you are using, type:
$ echo $SHELL
/bin/bash
To do so, edit your bash file:
$ nano ~/.bash_profile
configure your $PATH variables by adding the following lines to your ~/.bash_profile file:
export SPARK_HOME=/opt/spark
export PATH=$SPARK_HOME/bin:$PATH
# For python 3, You have to add the line below or you will get an error
export PYSPARK_PYTHON=python3
Now to run PySpark in Jupyter you’ll need to update the PySpark driver environment variables. Just add these lines to your ~/.bash_profile file:
Restart (our just source) your terminal and launch PySpark:
$ pyspark
This command should start a Jupyter Notebook in your web browser. Create a new notebook by clicking on ‘New’ > ‘Notebooks Python [default]’.
Running PySpark in Jupyter Notebook
The PySpark context can be
sc = SparkContext.getOrCreate()
To check if your notebook is initialized with SparkContext, you could try the following codes in your notebook:
sc = SparkContext.getOrCreate()
import numpy as np
TOTAL = 10000
dots = sc.parallelize([2.0 * np.random.random(2) - 1.0 for i in range(TOTAL)]).cache()
print("Number of random points:", dots.count())
stats = dots.stats()
print('Mean:', stats.mean())
print('stdev:', stats.stdev())
The result:
Running PySpark in your favorite IDE
Sometimes you need a full IDE to create more complex code, and PySpark isn’t on sys.path by default, but that doesn’t mean it can’t be used as a regular library. You can address this by adding PySpark to sys.path at runtime. The package findspark does that for you.
To install findspark just type:
$ pip3 install findspark
And then on your IDE (I use Eclipse and Pydev) to initialize PySpark, just call: