How to fix “Your CPU supports instructions that this TensorFlow binary was not compiled to use: AVX2 FMA”

After installing Tensorflow using pip3 install:

sudo pip3 install tensorflow

I’ve received the following warning message:

I tensorflow/core/platform/cpu_feature_guard.cc:142] Your CPU supports instructions that this TensorFlow binary was not compiled to use: AVX2 FMA

Advanced Vector Extensions (AVX) are extensions to the x86 instruction set architecture for microprocessors from Intel and AMD proposed by Intel in March 2008 and first supported by Intel with the Sandy Bridge processor shipping in Q1 2011 and later on by AMD with the Bulldozer processor shipping in Q3 2011. AVX provides new features, new instructions, and a new coding scheme.

AVX introduces fused multiply-accumulate (FMA) operations, which speed up linear algebra computation, namely dot-product, matrix multiply, convolution, etc. Almost every machine-learning training involves a great deal of these operations, hence will be faster on a CPU that supports AVX and FMA (up to 300%).

We won’t ignore the warning message and we will compile TF from source.

We will start with uninstalling the default version of  Tensorflow:

sudo pip3 uninstall protobuf
sudo pip3 uninstall tensorflow

In a temp folder, clone Tensorflow:

git clone https://github.com/tensorflow/tensorflow 
git checkout r2.0

Install the TensorFlow pip package dependencies:

pip3 install -U --user pip six numpy wheel setuptools mock future>=0.17.1
pip3 install -U --user keras_applications==1.0.6 --no-deps
pip3 install -U --user keras_preprocessing==1.0.5 --no-deps

Install Bazel, the build tool used to compile TensorFlow. In my case, after downloading bazel-0.26.0-installer-darwin-x86_64.sh:

chmod +x bazel-0.26.0-installer-darwin-x86_64.sh ./bazel-0.26.0-installer-darwin-x86_64.sh --user export PATH="$PATH:$HOME/bin" bazel version

Configure your system build by running the following at the root of your TensorFlow source tree:

./configure

The Tensorflow build options expose flags to enable building for platform-specific CPU instruction sets:

Use bazel to make the TensorFlow package builder with CPU-only support:

bazel build -c opt --copt=-mavx --copt=-mavx2 --copt=-mfma --copt=-msse4.2 //tensorflow/tools/pip_package:build_pip_package

The bazel build command creates an executable named build_pip_package—this is the program that builds the pip package. Run the executable as shown below to build a .whl package in the /tmp/tensorflow_pkg directory.

To build from a release branch:

./bazel-bin/tensorflow/tools/pip_package/build_pip_package /tmp/tensorflow_pkg

Output wheel file is in: /tmp/tensorflow_pkg

You can download the file from here, and try to install it directly

pip3 install /tmp/tensorflow_pkg/tensorflow-2.0.0b1-cp37-cp37m-macosx_10_14_x86_64.whl 

cd out of that directory, and now running this should not produce any warning:

python3 -c "import tensorflow as tf;print(tf.reduce_sum(tf.random.normal([1000, 1000])))"

Enjoy!

Fighting Digital Payments Fraud with Deep Learning

Interesting presentation today at the DataScience SG meet-up

Conventional fraud prevention methods are rule based, expansive and slow to implement

Q1 2016: $5 of every $100 subject to fraud attack!

Key fraud types: account takeover, friendly fraud & fraud due to stolen card information

Consumers want: easy, instant, customized, mobile and dynamic options to suit their personal situation. Consumers do NOT want to be part of the fraud detection process.

Key technology enablers:

Historically fraud detection systems have relied on rues hand-curated by fraud experts to catch fraudulent activity.

An auto-encoder is a neural network trained to reconstruct its inputs, which forces a hidden layer to try and to learn good representations of the input

Kaggle dataset:

Train Autoencoder on normal transactions and using the Autoencoder transformation there is now a clear separation between the normal and the fraudulent transactions.

Highlights of the 2018 Singapore Symposium on Natural Language Processing (SSNLP)

What a great symposium! Thank you Dr. Linlin Li, Prof. Ido Dagan, Prof. Noah Smith and the rest of the speakers for the interesting talks and thank you Singapore University of Technology and Design (SUTD) for hosting this event. Here is a quick summary of the first half of the symposium, you can learn more by looking for the papers published by these research groups:

Linlin Li: The text processing engine that powers Alibaba’s business applications

Dr. Linlin Li from Alibaba presented the mission of Alibaba’s NLP group and spoke about AliNLP, a large scale NLP technology platform for the entire Alibaba Eco-system, dealing with data collection and multilingual algorithms for lexical, syntactic, semantic, discourse analysis and distributed representation of text.

Alibaba is also helping to improve the quality of the Electronic Medical Records (EMRs) in China, traditionally done by labour intensive methods.

Ido Dagan: Consolidating Textual Information

Prof. Ido Dagan gave an excellent presentation on Natural Knowledge Consolidating Textual Information. Texts come in large multitudes, such as news story, search results, and product reviews. Search interfaces hasn’t changed much in decades, which make them accessible, but hard to consume. For example, the news tweets illustration in the slide below shows that here is a lot of redundancy and complementary information, so there is a need to consolidate the knowledge within multiple texts.

Generic knowledge representation via structured knowledge graphs and semantic representation are often being used, where both approaches require an expert to annotate the dataset, which is expansive and hard to replicate.

The structure of a single sentence will look like this:

The information can be consolidated across the various data sources via Coreference

To conclude

Noah A. Smith: Syncretizing Structured and Learned Representation

Prof. Noah described new ways to use representation learning for NLP

Some promising results

Prof. Noah presented different approaches to solve backpropagation with structure in the middle, where the intermediate representation is non-differentiable.

See you all the the next conference!

Using Deep Neural Networks for NLP Applications – MAS

Really enjoyed visiting the Monetary Authority of Singapore (MAS) and talking on the applications of Deep Neural Networks for Natural Language Processing (NLP).

IMG_0993

During the talk, there were some great questions from the audience, one of them was “can a character level  model capture the unique structure of words and sentences? ” The answer is YES, and I hope that the demo, showing a three-layers 512-units LSTM model trained on publicly-available Regulatory and Supervisory Framework documents downloaded from the MAS website, predicting the next character and repeating it many times, helped to clarify the answer.

MAS Video Capture

Training the same model on Shakespeare’s works and running both models side by side was fun!  

LSTM


Install GPU TensorFlow on AWS Ubuntu 16.04

 TensorFlow™ is an open source software library for numerical computation using data flow graphs. Nodes in the graph represent mathematical operations, while the graph edges represent the multidimensional data arrays (tensors) communicated between them.

On a typical system, there are multiple computing devices. In TensorFlow, the supported device types are CPU and GPU.  GPUs offer 10 to 100 times more computational power than traditional CPUs, which is one of the main reasons why graphics cards are currently being used to power some of the most advanced neural networks responsible for deep learning.

The environment setup is often the hardest part of getting a deep learning setup going, so hopefully you will find this step-by-step guide helpful.

Launch a GPU-enabled Ubuntu 16.04 AWS instance

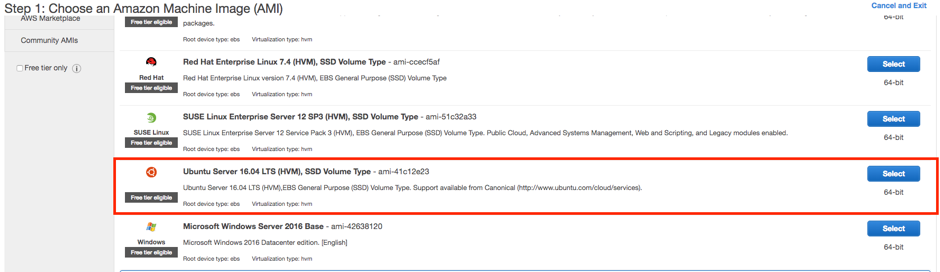
Choose an Amazon Machine Image (AMI) – Ubuntu Server 16.04 LTS

AWS-Ubuntu

Choose an instance type

The smallest GPU-enabled machine is p2.xlarge

AWS-Ubuntu-GPUs

You can find more details here.

Configure Instance Details, Add Storage (choose storage size), Add Tags, Configure Security Group and Review Instance Launch and Launch.

launch-status

Open the terminal on your local machine and connect to the remote machine (ssh -i)

Update the package lists for upgrades for packages that need upgrading, as well as new packages that have just come to the repositories

sudo apt-get –assume-yes update

Install the newer versions of the packages

sudo apt-get –assume-yes  upgrade

Install the CUDA 8 drivers

CUDA is a parallel computing platform and application programming interface (API) model created by Nvidia. GPU-accelerated CUDA libraries enable drop-in acceleration across multiple domains such as linear algebra, image and video processing, deep learning and graph analytics.

Verify that you have a CUDA-Capable GPU

lspci | grep -i nvidia
00:1e.0 3D controller: NVIDIA Corporation GK210GL [Tesla K80] (rev a1)

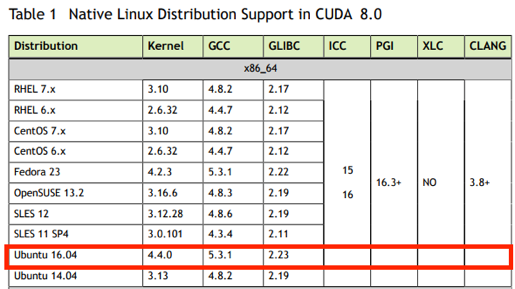
Verify You Have a Supported Version of Linux

uname -m && cat /etc/*release

x86_64
DISTRIB_ID=Ubuntu
…..

The x86_64 line indicates you are running on a 64-bit system. The remainder gives information about your distribution.

 Verify the System Has gcc Installed

gcc –version

If the message is “The program ‘gcc’ is currently not installed. You can install it by typing: sudo apt install gcc”

sudo apt-get install gcc

gcc –version

gcc (Ubuntu 5.4.0-6ubuntu1~16.04.5) 5.4.0 20160609

….

Verify the System has the Correct Kernel Headers and Development Packages Installed

uname –r

4.4.0-1038-aws

CUDA support

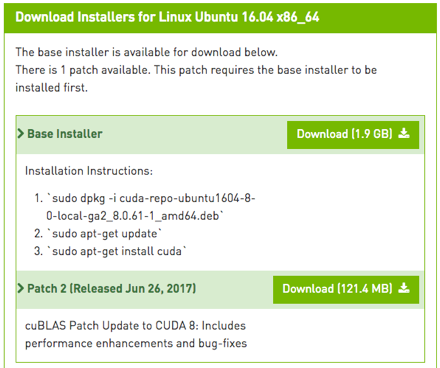
Download the CUDA-8 driver (CUDA 9 is not yet supported by TensorFlow 1.4)

The driver can be downloaded from here:

CUDA-download-toolikit

CUDA-download-toolikit-installer

Or, downloaded directly to the remote machine:

wget -O ./cuda-repo-ubuntu1604-8-0-local-ga2_8.0.61-1_amd64.deb https://developer.nvidia.com/compute/cuda/8.0/Prod2/local_installers/cuda-repo-ubuntu1604-8-0-local-ga2_8.0.61-1_amd64-deb

Downloading patch 2 as well:

wget -O ./cuda-repo-ubuntu1604-8-0-local-cublas-performance-update_8.0.61-1_amd64.deb https://developer.nvidia.com/compute/cuda/8.0/Prod2/patches/2/cuda-repo-ubuntu1604-8-0-local-cublas-performance-update_8.0.61-1_amd64-deb

Install the CUDA 8 driver and patch 2

Extract, analyse, unpack and install the downloaded .deb files

sudo dpkg -i cuda-repo-ubuntu1604-8-0-local-ga2_8.0.61-1_amd64.deb

sudo dpkg -i cuda-repo-ubuntu1604-8-0-local-cublas-performance-update_8.0.61-1_amd64.deb

apt-key is used to manage the list of keys used by apt to authenticate packages. Packages which have been authenticated using these keys will be considered trusted.

sudo apt-key add /var/cuda-repo-8-0-local-ga2/7fa2af80.pub
sudo apt-key add /var/cuda-repo-8-0-local-cublas-performance-update/7fa2af80.pub

sudo apt-get update

Once completed (~10 min), reboot the system to load the NVIDIA drivers.

sudo shutdown -r now

Install cuDNN v6.0

The NVIDIA CUDA® Deep Neural Network library (cuDNN) is a GPU-accelerated library of primitives for deep neural networks. cuDNN provides highly tuned implementations for standard routines such as forward and backward convolution, pooling, normalization, and activation layers.

Download the cuDNN v6.0 driver

The driver can be downloader from here: please note that you will need to register first.

cuDNN-download2

Copy the driver to the AWS machine (scp -r -i)

Extract the cuDNN files and copy them to the target directory

tar xvzf cudnn-8.0-linux-x64-v6.0.tgz  

sudo cp -P cuda/include/cudnn.h /usr/local/cuda/includesudo

cp -P cuda/lib64/libcudnn* /usr/local/cuda/lib64

sudo chmod a+r /usr/local/cuda/include/cudnn.h /usr/local/cuda/lib64/libcudnn*

Update your bash file

nano ~/.bashrc

Add the following lines to the end of the bash file:

export CUDA_HOME=/usr/local/cuda

export LD_LIBRARY_PATH=${CUDA_HOME}/lib64:$LD_LIBRARY_PATH

export PATH=${CUDA_HOME}/bin:${PATH}

bashrc

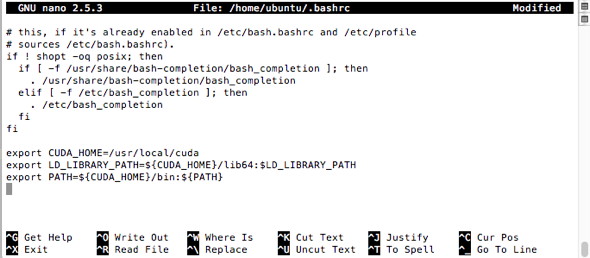
Save the file and exit.

Install TensorFlow

Install the libcupti-dev library

The libcupti-dev library is the NVIDIA CUDA Profile Tools Interface. This library provides advanced profiling support. To install this library, issue the following command:

sudo apt-get install libcupti-dev

Install pip

Pip is a package management system used to install and manage software packages written in Python which can be found in the Python Package Index (PyPI).

sudo apt-get install python-pip

sudo pip install –upgrade pip

Install TensorFlow

sudo pip install tensorflow-gpu

Test the installation

Run the following within the Python command line:

from tensorflow.python.client import device_lib

def get_available_gpus():

    local_device_protos = device_lib.list_local_devices()

    return [x.name for x in local_device_protos if x.device_type == ‘GPU’]

get_available_gpus()

The output should look similar to that:

2017-11-22 03:18:15.187419: I tensorflow/core/platform/cpu_feature_guard.cc:137] Your CPU supports instructions that this TensorFlow binary was not compiled to use: SSE4.1 SSE4.2 AVX AVX2 FMA

2017-11-22 03:18:17.986516: I tensorflow/stream_executor/cuda/cuda_gpu_executor.cc:892] successful NUMA node read from SysFS had negative value (-1), but there must be at least one NUMA node, so returning NUMA node zero

2017-11-22 03:18:17.986867: I tensorflow/core/common_runtime/gpu/gpu_device.cc:1030] Found device 0 with properties:

name: Tesla K80 major: 3 minor: 7 memoryClockRate(GHz): 0.8235

pciBusID: 0000:00:1e.0

totalMemory: 11.17GiB freeMemory: 11.10GiB

2017-11-22 03:18:17.986896: I tensorflow/core/common_runtime/gpu/gpu_device.cc:1120] Creating TensorFlow device (/device:GPU:0) -> (device: 0, name: Tesla K80, pci bus id: 0000:00:1e.0, compute capability: 3.7)

[u’/device:GPU:0′]