Git Pull While Ignoring Local Changes

Git pull may result with the following error message:

error: Your local changes to the following files would be overwritten by merge

Please, commit your changes or stash them before you can merge.

The following solution works for me:

Fetch all changes:

git fetch --all

Reset

git reset --hard origin/master

Pull

git pull


Changing the Game with Data and Insights – Data Science Singapore

Another great Data Science Singapore (DSSG) event! Hong Cao from McLaren Applied Technologies shared his insights on applications of data science at McLaren.

The first project is using economic sensors for continuous human conditions monitoring, including sleep quality, gait and activities, perceived stress and cognitive performance.

DataScience

Gait outlier analysis provides unique insight on fatigue levels while exercising, probability of injury and post surgery performance and recovery.

Gait Analysis Data Science

DataScience(1)DataScience(3)

A related study looks into how biotelemetry assist in patient treatment such as ALS (Amyotrophic Lateral Sclerosis) disease progression monitoring. The prototype tools collect heart rate, activity and speech data to analyse disease progression.

DataScience(3)

HRV (Heart Rate Variability) features are extracted from both the time and from the frequency domains.

DataScience(4)

Activity score is derived from the three-axis accelerometer data.

DataScience(5)DataScience(6)

The second project was a predictive failure POC, to help determine the condition of Haul Trucks in order to predict when a failure might happen. The cost of having an excavator go down in the field is $5 million a day, while the cost of losing a haul truck is $1.8 million per day. If you can prevent it from going down in the field, that makes a huge difference

DataScience(7)DataScience(8)DataScience(9)DataScience(10)DataScience(11)DataScience(12)

Enhance your Privacy: 3 Easy Steps To Setup Opera’s Unlimited and FREE VPN

Opera is the first major browser maker to integrate an unlimited and free VPN or virtual private network. Now, you don’t have to download VPN extensions or pay for VPN subscriptions to access blocked websites and to shield your browsing when on public Wi-Fi.

OperaVPNOverall


With a free, unlimited, native VPN that just works out-of-the-box and doesn’t require any subscription, Opera wants to make VPNs available to everyone.

According to Global Web Index, more than half a billion people (24 percent of the world’s online population) have tried or are currently using VPN services. According to the research, the primary reasons people use a VPN are for better access to entertainment content, browser anonymity, and the ability to access sites restricted by their workplace or country.

  1. Download & Install

To test this new feature, start by downloading and installing Opera’s Developer version 

After downloading OperaSetupDeveloper.zip, unzip it and double-click the Opera Installer.

 OperaInstallerInternet

Click Open

OperaInstaller

Complete the installation process.

  1. To enable the VPN function, click the Opera menu, then scroll down to Preferences…


OperaDeveloperPreferences

Under Privacy & Security, click the checkbox to enable the VPN function

OperaPrivacySecurityDeveloper

  1. Open a new browser tab or window in Opera and click on the “VPN” blue button that is in the URL link bar, pull down the ‘Virtual Location’ menu to choose the IP region to mimic (currently Canada, Germany, United States).

OperaVPNOK

Now that the Opera VPN has been enabled, you can toggle the VPN off by clicking on the VPN button and flipping the switch to the OFF position, and back on again by returning to the same menu and flipping it back to the ON position

Prior to this new feature Opera recommended VPN provider was SurfEasy VPN, a company that was bought by Opera about a year ago. The cheapest SurfEasy plan starts from $6.49 a month.

OperaSurfEasyPlan

Most of the times the VPN worked well, but occasionally I’ve received the following error message “VPN is temporarily unavailable. Opera is resolving this issue”. At this stage instability is expected


Using Python server to run d3js code from local Windows directory

Some of the d3js code samples may produce errors in certain browsers when you try to run static files locally.
You can run python’s simplehttpserver while browsing the samples.

  1. Open up a new Command Prompt window:
    1. WinKey+R
    2. Input “cmd“.
    3. Enter
  2. Via the command line, navigate into the directory that you want served. For example, if your project folder is in your c:tmp folder, you could type:
    cd c:tmp
  3. To start the HTTP server type:
    python -m SimpleHTTPServer 8888 &
  4. To stop the HTTP server from the Command Prompt use the keyboard command Ctrl+C (⌃+C)
  5. Switch back to your web browser and visit the following URL: http://localhost:8888/

The Art of the One Page Strategy

Most enterprises invest substantial time and energy into robust IT strategy documents that Gartner refers to as “WORN” (written once, read never).

To succeed, the CIO needs to create context to articulate the contribution of IT to the business process and capabilities, answering these three key questions:

1. What do we need to do to “win” in the marketplace?
2. What new business capabilities are required to achieve success?
3. How will IT contribute to that success?

Southwest Airlines Business Plan

Southwest Airlines business plan on a cocktail napkin

Michael Treacy and Fred Wiersema found three approaches to market differentiation:

Companies that have taken leadership positions in their industries in the last decade typically have done so by narrowing their business focus, not broadening it. They have focused on delivering superior customer value in line with one of three value disciplines—operational excellence, customer intimacy, or product leadership

Operational Excellence: providing customers with reliable products or services at competitive prices, driving costs out of core processes (business and IT).

Customer Intimacy: combining detailed customer knowledge with operational flexibility, segmenting and targeting markets precisely and then tailoring offerings to match exactly the demands of those niches. As a consequence, these companies engender tremendous customer loyalty.

Product Leadership: offering customers leading-edge products and services that consistently enhance the customer’s use or application of the product, thereby making rivals’ goods obsolete.

Companies that push the boundaries of one value discipline while meeting industry standards in the other two gain such a lead that competitors find it hard to catch up!

How To Find The Lag That Results In Maximum Cross-Correlation [R]

I have two time series and I want to find the lag that results in maximum correlation between the two time series. The basic problem we’re considering is the description and modeling of the relationship between these two time series.

In signal processing, cross-correlation is a measure of similarity of two series as a function of the lag of one relative to the other. This is also known as a sliding dot product or sliding inner-product.

For discrete functions, the cross-correlation is defined as:

corr

In the relationship between two time series (yt and xt), the series yt may be related to past lags of the x-series.  The sample cross correlation function (CCF) is helpful for identifying lags of the x-variable that might be useful predictors of yt.

In R, the sample CCF is defined as the set of sample correlations between xt+h and yt for h = 0, ±1, ±2, ±3, and so on.

A negative value for h is a correlation between the x-variable at a time before t and the y-variable at time t.   For instance, consider h = −2.  The CCF value would give the correlation between xt-2 and yt.

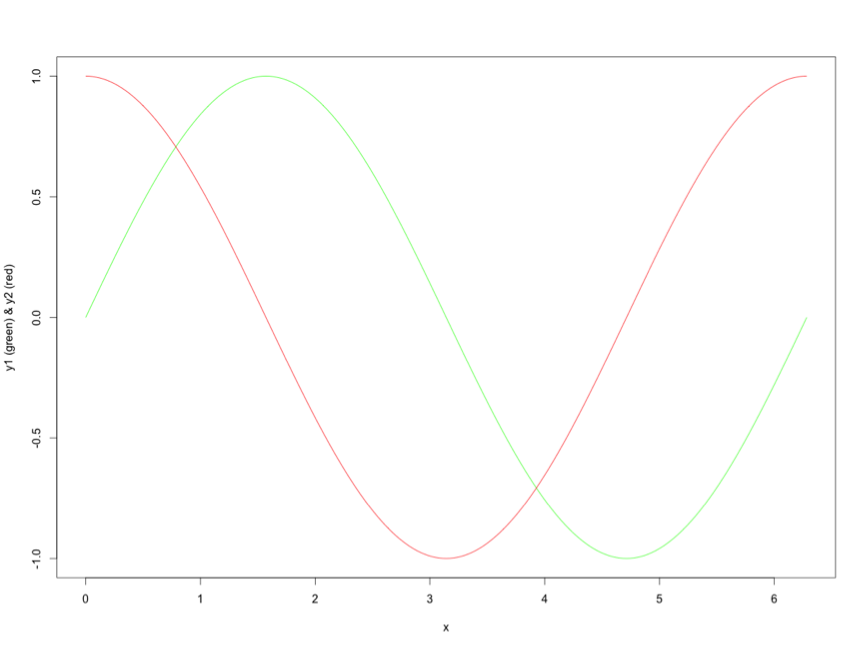
For example, let’s start with the first series, y1:

x <- seq(0,2*pi,pi/100)
length(x)
# [1] 201

y1 <- sin(x)
plot(x,y1,type="l", col = "green")

ser1

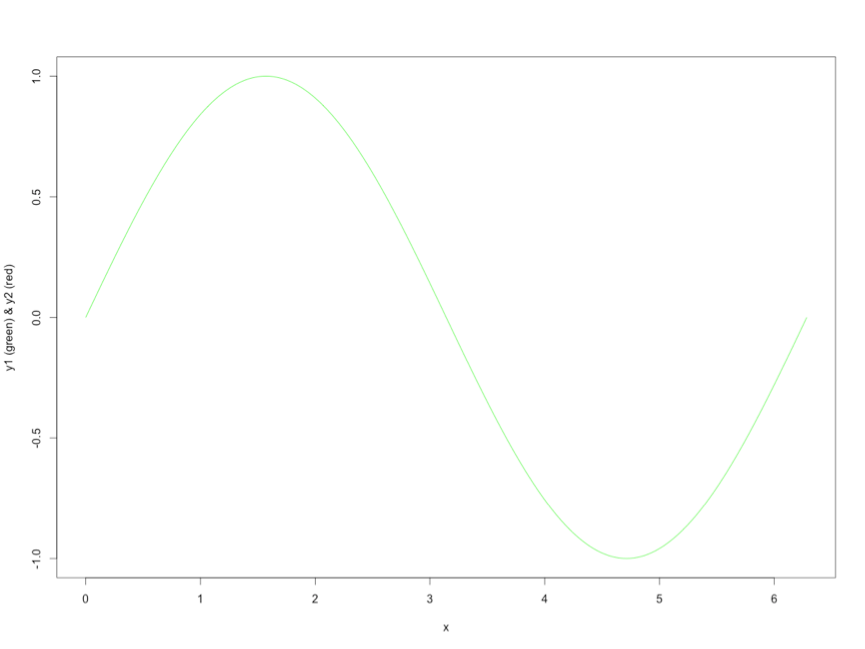
Adding series y2, with a shift of pi/2:

y2 <- sin(x+pi/2)
lines(x,y2,type="l",col="red")

ser2

Applying the cross correlation function (cff)

cv <- ccf(x = y1, y = y2, lag.max = 100, type = c("correlation"),plot = TRUE)

corr

The maximal correlation is calculated at a positive shift of the y1 series:

cor = cv$acf[,,1]
lag = cv$lag[,,1]
res = data.frame(cor,lag)
res_max = res[which.max(res$cor),]$lag
res_max
# [1] 44

Which means that maximal correlation between series y1 and series y2 is calculated between y1t+44 and y2t

corr-2


Stop F8 Key From Launching iTunes While Debugging in Android Studio

While debugging my code in Android Studio, pressing F8 for Step Over launched iTunes.

The solution: navigate to System Preferences -> Keyboard -> Keyboard  and tick the “Use all F1, F2 etc. keys as standard function keys”.

Keyboard F8

Android Studio Tips and Tricks

Editor Actions

If you’re unfamiliar with using Android Studio and the IntelliJ IDEA interface, this page provides some tips to help you get started with some of the most common tasks and productivity enhancements.

[table id=1 /]

It is always useful to visit Android Studio -> Preferences -> Keymap for the full list of shortcuts

Keymap

Tick Android Studio -> Preferences -> Editor -> General -> Appearance -> Show line number 


Modify the Shell Path in OSX to Access adb Through Terminal

The shell path for a user in OSX is a set of locations in the filing system whereby the user can use certain applications, commands and programs without the need to specify the full path to that command or program in the Terminal. This will work in all OSX operating systems.

You can find out whats in your path by launching Terminal in Applications/Utilities and entering:

echo $PATH

Adding in a Permanent Location

To make the new path stick permanently you need to create a .bash_profile file in your home directory and set the path there. This file control various Terminal environment preferences including the path.

nano  ~/.bash_profile

Create the .bash_profile file with a command line editor called nano

export PATH="/Users/ofir/Library/Android/sdk/platform-tools:$PATH"

Add in the above line which declares the new location /Users/ofir/Library/Android/sdk/platform-tools as well as the original path declared as $PATH.

So now when the Terminal is relaunched or a new window made and you check the the path by

echo $PATH

You will get the new path at the front followed by the default path locations, all the time

/Users/ofir/Library/Android/sdk/platform-tools:/usr/local/bin:/usr/bin:/bin:/usr/sbin:/sbin:/opt/X11/bin:/usr/local/git/bin


Bluetooth Debugging on Android Wear

I’ve just bought a new ASUS ZenWatch and I’m working on a small application to extract the sensors data from the watch.

This post ( http://developer.android.com/training/wearables/apps/bt-debugging.html ) is describing the basic steps required to setup a device for debugging and to setup a debugging session. I’ve listed below some additional steps to help with the troubleshooting if things doesn’t work as planned.

Android Debug Bridge (adb)

Android Debug Bridge (adb) is a versatile command line tool that lets you communicate with an emulator instance or connected Android-powered device. It is a client-server program that includes three components:

  • A client, which runs on your development machine. You can invoke a client from a shell by issuing an adb command. Other Android tools such as DDMS also create adb clients.
  • A server, which runs as a background process on your development machine. The server manages communication between the client and the adb daemon running on an emulator or device.
  • A daemon, which runs as a background process on each emulator or device instance.

Setup Devices for Debugging


  1. Enable USB debugging on the handheld:
    • Open the Settings app and scroll to the bottom.
    • If it doesn’t have a Developer Options setting, tap About Phone (or About Tablet), scroll to the bottom, and tap the build number 7 times.
    • Go back and tap Developer Options.
    • Enable USB debugging.
  2. Enable Bluetooth debugging on the wearable:
    1. Tap the home screen twice to bring up the Wear menu.
    2. Scroll to the bottom and tap Settings.
    3. Scroll to the bottom. If there’s no Developer Options item, tap About, and then tap the build number 7 times.
    4. Tap the Developer Options item.
    5. Enable Debug over Bluetooth.

Set Up a Debugging Session


  • On the handheld, open the Android Wear companion app.
  • Tap the menu on the top right and select Settings.
  • Enable Debugging over Bluetooth. You should see a tiny status summary appear under the option:
Host: disconnected
Target: connected
  • Connect the handheld to your machine over USB.
  • In the Android Studio open the Terminal (Alt+F12 Windows) and run:
    adb forward tcp:4444 localabstract:/adb-hub
    adb connect localhost:4444

    Note: You can use any available port that you have access to.

    • adb forward forwards socket connections from a specified local port to a specified remote port on the emulator/device instance. Map a socket through the phone that is paired to your Wear device.
    • adb connect will connect to the device
  • A message will appear on the phone to allow Wear Debugging, press OK

WearDebugger

  • In the Android Wear companion app, you should see the status change to:
Host: connected
Target: connected

Well, this is the happy flow.

While debugging I’ve encountered some issues, especially after disconnecting the phone from the USB cable.

First, print a list of all attached emulator/device instances:

adb devices
List of devices attached
LGD855bxxxxx  device

In this case you can see only the phone and not the watch, so you will need to execute

adb forward tcp:4444 localabstract:/adb-hub
adb connect localhost:4444

In other cases you may get the error message

error: more than one device/emulator

You may need to terminates the adb server process:

adb kill-server

Now you can execute the adb forward and adb connect commands

adb forward tcp:4444 localabstract:/adb-hub
adb connect localhost:4444

If you get an error message

error: device unauthorized.

Try revoking the permissions on the device – Developer options -> Revoke USB debugging authorizations. Then plug the device in and accept it again.