
History
Airflow was started in October 2014 by Maxime Beauchemin at Airbnb. It was open source from the very first commit and officially brought under the Airbnb GitHub and announced in June 2015.
The project joined the Apache Software Foundation’s Incubator program in March 2016 and the Foundation announced Apache Airflow as a Top-Level Project in January 2019.
Apache Airflow is in use at more than 200 organizations, including Adobe, Airbnb, Astronomer, Etsy, Google, ING, Lyft, NYC City Planning, Paypal, Polidea, Qubole, Quizlet, Reddit, Reply, Solita, Square, Twitter, and United Airlines, among others.
Introduction
Airflow is a platform to programmatically author, schedule and monitor workflows.
Use airflow to author workflows as directed acyclic graphs (DAGs) of tasks. The airflow scheduler executes your tasks on an array of workers while following the specified dependencies. Rich command line utilities make performing complex surgeries on DAGs a snap. The rich user interface makes it easy to visualize pipelines running in production, monitor progress, and troubleshoot issues when needed.
When workflows are defined as code, they become more maintainable, versionable, testable, and collaborative.
Workflows
We’ll create a workflow by specifying actions as a Directed Acyclic Graph (DAG) in Python. The tasks of a workflow make up a Graph; the graph is Directed because the tasks are ordered; and we don’t want to get stuck in an eternal loop so the graph also has to be Acyclic.
The figure below shows an example of a DAG:
Installation
pip3 install apache-airflow
airflow version

AIRFLOW_HOME is the directory where you store your DAG definition files and Airflow plugins
mkdir Airflow
export AIRFLOW_HOME=`pwd`/Airflow
Airflow requires a database to be initiated before you can run tasks. If you’re just experimenting and learning Airflow, you can stick with the default SQLite option.
airflow initdb
ls -l Airflow/
The database airflow.db is created

You can start Airflow UI by issuing the following command:
airflow webserver
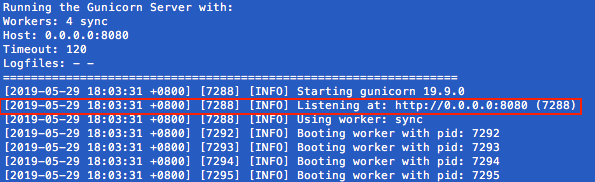
Opening http://0.0.0.0:8080

Your first Airflow DAG
We’ll start by creating a Hello World workflow, which does nothing other then sending “Hello world!” to the log.
Create your dags folder, that is the directory where your DAG definition files will be stored in AIRFLOW_HOME/dags. Inside that directory create a file named hello_world.py:
mkdir dags

Add the following code to dags/hello_world.py
from datetime import datetime
from airflow import DAG
from airflow.operators.dummy_operator import DummyOperator
from airflow.operators.python_operator import PythonOperator

def print_hello():
    return 'Hello world!'

dag = DAG('hello_world', description='Simple tutorial DAG',
          schedule_interval='0 12 * * *',
          start_date=datetime(2019, 5, 29), catchup=False)

dummy_operator = DummyOperator(task_id='dummy_task', retries=3, dag=dag)

hello_operator = PythonOperator(task_id='hello_task', python_callable=print_hello, dag=dag)

dummy_operator >> hello_operator
This file creates a simple DAG with just two operators, the DummyOperator, which does nothing and a PythonOperator which calls the print_hello function when its task is executed.
Running your DAG
Open a second terminal, go to the AIRFLOW_HOME folder and start the Airflow scheduler by issuing :
export AIRFLOW_HOME=`pwd`
airflow scheduler

When you reload the Airflow UI in your browser, you should see your hello_world DAG listed in Airflow UI.

In order to start a DAG Run, first turn the workflow on, then click the Trigger Dag button and finally, click on the Graph View to see the progress of the run.


After clicking the Graph View:

You can reload the graph view until both tasks reach the status Success.

When they are done, you can click on the hello_task and then click View Log.

If everything worked as expected, the log should show a number of lines and among them something like this:

Your first Airflow Operator
Let’s start writing our own Airflow operators. An Operator is an atomic block of workflow logic, which performs a single action. Operators are written as Python classes (subclasses of BaseOperator), where the __init__ function can be used to configure settings for the task and a method named execute is called when the task instance is executed.
Any value that the execute method returns is saved as an Xcom message under the key return_value. We’ll cover this topic later.
The execute method may also raise the AirflowSkipException from airflow.exceptions. In such a case the task instance would transition to the Skipped status.
If another exception is raised, the task will be retried until the maximum number of retries is reached.
Remember that since the execute method can retry many times, it should be idempotent [it can be applied multiple times without changing the result beyond the initial application]
We’ll create your first operator in an Airflow plugin file named plugins/my_operators.py. First create the /plugins directory, then add the my_operators.py file with the following content:
import logging

from airflow.models import BaseOperator
from airflow.plugins_manager import AirflowPlugin
from airflow.utils.decorators import apply_defaults

log = logging.getLogger(__name__)

class MyFirstOperator(BaseOperator):

    @apply_defaults
    def __init__(self, my_operator_param, *args, **kwargs):
        self.operator_param = my_operator_param
        super(MyFirstOperator, self).__init__(*args, **kwargs)

    def execute(self, context):
        log.info("Hello World!")
        log.info('operator_param: %s', self.operator_param)

class MyFirstPlugin(AirflowPlugin):
    name = "my_first_plugin"
    operators = [MyFirstOperator]
In this file we are defining a new operator named MyFirstOperator. Its execute method is very simple, all it does is log “Hello World!” and the value of its own single parameter. The parameter is set in the __init__ function.
We are also defining an Airflow plugin named MyFirstPlugin. By defining a plugin in a file stored in the /plugins directory, we’re providing Airflow the ability to pick up our plugin and all the operators it defines. We’ll be able to import these operators later using the line from airflow.operators import MyFirstOperator.
Now, we’ll need to create a new DAG to test our operator. Create a dags/test_operators.py file and fill it with the following content:
from datetime import datetime
from airflow import DAG
from airflow.operators.dummy_operator import DummyOperator
from airflow.operators import MyFirstOperator

dag = DAG('my_test_dag', description='Another tutorial DAG',
          schedule_interval='0 12 * * *',
          start_date=datetime(2019, 5, 29), catchup=False)

dummy_task = DummyOperator(task_id='dummy_task', dag=dag)

operator_task = MyFirstOperator(my_operator_param='This is a test.',
                                task_id='my_first_operator_task', dag=dag)

dummy_task >> operator_task
Here we just created a simple DAG named my_test_dag with a DummyOperator task and another task using our new MyFirstOperator. Notice how we pass the configuration value for my_operator_param here during DAG definition.
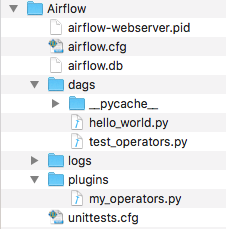
At this stage your source tree looks like this:
To test your new operator, you should stop (CTRL-C) and restart your Airflow web server and scheduler. Afterwards, go back to the Airflow UI, turn on the my_test_dag DAG and trigger a run. Take a look at the logs for my_first_operator_task.


Your first Airflow Sensor
An Airflow Sensor is a special type of Operator, typically used to monitor a long running task on another system.
To create a Sensor, we define a subclass of BaseSensorOperator and override its poke function. The poke function will be called over and over every poke_interval seconds until one of the following happens:
- poke returns True – if it returns False it will be called again.
- poke raises an AirflowSkipException from airflow.exceptions – the Sensor task instance’s status will be set to Skipped.
- poke raises another exception, in which case it will be retried until the maximum number of retries is reached.
As an example, SqlSensor runs a sql statement until a criteria is met, HdfsSensor waits for a file or folder to land in HDFS, S3KeySensor waits for a key (a file-like instance on S3) to be present in a S3 bucket), S3PrefixSensor waits for a prefix to exist and HttpSensor executes a HTTP get statement and returns False on failure.
To add a new Sensor to your my_operators.py file, add the following code:
from datetime import datetime
from airflow.operators.sensors import BaseSensorOperator

class MyFirstSensor(BaseSensorOperator):

    @apply_defaults
    def __init__(self, *args, **kwargs):
        super(MyFirstSensor, self).__init__(*args, **kwargs)

    def poke(self, context):
        current_minute = datetime.now().minute
        if current_minute % 3 != 0:
            log.info("Current minute (%s) not is divisible by 3, sensor will retry.", current_minute)
            return False

        log.info("Current minute (%s) is divisible by 3, sensor finishing.", current_minute)
        return True
Here we created a very simple sensor, which will wait until the the current minute is a number divisible by 3. When this happens, the sensor’s condition will be satisfied and it will exit. This is a contrived example, in a real case you would probably check something more unpredictable than just the time.
Remember to also change the plugin class, to add the new sensor to the operators it exports:
class MyFirstPlugin(AirflowPlugin):
    name = "my_first_plugin"
    operators = [MyFirstOperator, MyFirstSensor]
The final my_operators.py file is:
import logging

from airflow.models import BaseOperator
from airflow.plugins_manager import AirflowPlugin
from airflow.utils.decorators import apply_defaults

from datetime import datetime
from airflow.operators.sensors import BaseSensorOperator

log = logging.getLogger(__name__)

class MyFirstOperator(BaseOperator):

    @apply_defaults
    def __init__(self, my_operator_param, *args, **kwargs):
        self.operator_param = my_operator_param
        super(MyFirstOperator, self).__init__(*args, **kwargs)

    def execute(self, context):
        log.info("Hello World!")
        log.info('operator_param: %s', self.operator_param)

class MyFirstSensor(BaseSensorOperator):

    @apply_defaults
    def __init__(self, *args, **kwargs):
        super(MyFirstSensor, self).__init__(*args, **kwargs)

    def poke(self, context):
        current_minute = datetime.now().minute
        if current_minute % 3 != 0:
            log.info("Current minute (%s) not is divisible by 3, sensor will retry.", current_minute)
            return False

        log.info("Current minute (%s) is divisible by 3, sensor finishing.", current_minute)
        return True

class MyFirstPlugin(AirflowPlugin):
    name = "my_first_plugin"
    operators = [MyFirstOperator, MyFirstSensor]
You can now place the operator in your DAG, so the new test_operators.py file looks like:
from datetime import datetime
from airflow import DAG
from airflow.operators.dummy_operator import DummyOperator
from airflow.operators import MyFirstOperator, MyFirstSensor


dag = DAG('my_test_dag', description='Another tutorial DAG',
          schedule_interval='0 12 * * *',
          start_date=datetime(2019, 5, 29), catchup=False)

dummy_task = DummyOperator(task_id='dummy_task', dag=dag)

sensor_task = MyFirstSensor(task_id='my_sensor_task', poke_interval=30, dag=dag)

operator_task = MyFirstOperator(my_operator_param='This is a test.',
                                task_id='my_first_operator_task', dag=dag)

dummy_task >> sensor_task >> operator_task
Restart your webserver and scheduler and try out your new workflow. The Graph View looks like:

If you click View log of the my_sensor_task task, you should see something similar to this:

Have fun developing data pipelines!
References:
https://github.com/hgrif/airflow-tutorial
http://michal.karzynski.pl/blog/2017/03/19/developing-workflows-with-apache-airflow/
PyCon.DE 2017 Tamara Mendt – Modern ETL-ing with Python and Airflow (and Spark)

2 thoughts on “Get started developing workflows with Apache Airflow”
Comments are closed.